Showing posts with label recipes. Show all posts

December 10, 2013

cinnamon walnut biscotti


Life is beginning to feel a little more "normal".  I'm actually baking things in my kitchen!!  I also ventured outside with my kids today.  I haven't done that in a while.  Some of them rode scooters up and down the sidewalk, others ran behind giggling all the way.  It was good for them and it was also good for me.  The warmth of the sunshine felt wonderful.

The fact that I am posting a recipe today is completely unplanned and spontaneous.  Creative exploration  in the kitchen began last night as I prepared dinner.  I really wanted something bread-like to go with our bowtie pasta and salad.  I needed it to be quick and easy and only include ingredients that I had on hand.  Have I mentioned that we recently discovered a rosemary bush growing in our backyard?  You should have heard Brienne's squeals!  She knew I would be delighted since rosemary is one of my favorite things.  I thank God for blessing us with it because it sure came in handy for the biscuit recipe we tried.

So anyway, the biscuits were yummy and being able to just grab a sprig of rosemary from the backyard was such a thrill to me.  I really ought to get my own garden going.  It was also fun to try something new.

Well, today the trying of new things happily continued.  Since Brienne is on a baking kick lately, this morning I found her leafing through one of my recipe books.  It wasn't long before she enthusiastically asked me if we could bake a biscotti recipe.  How could I refuse?  You all know how much I like biscotti, right?  The thing was, we had to consider the ingredients we had on hand.  It's kind of like a fun game for us.  We look at what we have and we decide what we can do with it.

Recently, a sweet lady at church had given us a big bag of walnuts which we have been snacking on for weeks.  Thankfully, we still had plenty leftover to throw into this recipe.  It came together so well.

I love the soft and subtle crunch of the walnuts paired with the light taste of cinnamon.  And, of course, dunking them in a hot cup of coffee makes the perfect combination.


cinnamon walnut biscotti
{makes 24 biscotti}

Ingredients:

2 1/2 cups all-purpose flour
3/4 tsp. baking powder
1/2 tsp. salt
1 1/4 tsp. cinnamon
3/4 cup stick butter, softened
1 cup sugar
2 eggs
1 1/2 tsp. vanilla extract
1 cup walnut pieces, lightly toasted

DIRECTIONS: 
Preheat your oven to 350 degrees.  
Grease a baking sheet.

1.  In a large bowl, combine the first four dry ingredients and stir to combine with a wire whisk.  Set aside.
2.   With a mixer, cream the softened butter until fluffy, then gradually add the sugar as you mix.  Add each egg, one at a time and continue to mix.  Then add the vanilla extract.  Mix to combine.  Gradually add the dry ingredient mixture to the butter mixture and stir to combine and form a dough.  Set aside.
3.  To toast walnuts, heat a skillet over medium-high heat.  Toast the walnuts in the skillet for about four minutes.  Transfer to a cutting board and chop into small bits.  Stir the walnuts into the dough.
4.  Divide the dough in half.  Use flour on your hands to prevent stickiness.  Transfer dough to a baking sheet and form into 12" logs.  Flatten them out on the cookie sheet to about 1" thickness.
5.  Bake for 25-30 minutes, then cool on the baking sheet for 15 minutes.  Carefully transfer to a cutting board and cut into slices.  Place them (cut side up) on a baking sheet and bake for 5 minutes.  Then, turn them over (your hands are the simply the best tool for this) and bake them for 5 minutes more.  Allow the biscotti to cool on the baking sheet for 2 minutes, then transfer to a cooling rack.

These really are super easy to make.  But they will be such a special treat with your morning cup of coffee.  They will also make a great little gift when sealed up in pretty package and given to a friend.


March 20, 2013

Mini Chocolate Chip Scones


I made these scones for the first time yesterday and I believe we have found a new favorite.  I love scones!  I appreciate their texture.  They are a cross between a biscuit and a cake and they are wonderfully light and fluffy.  These little things are delicious!  And they go very well with a cup of coffee.  

Give this recipe a go.  I think you'll find that they are rather easy to make and sure to please the crowd! ;)


Mini Chocolate Chip Scones
makes 32 scones

Ingredients:

2 3/4 cups all-purpose flour
1/3 cup granulated sugar
1 Tbsp. baking powder
3/4 tsp. salt
8 Tbsp. (1 stick) unsalted cold butter, cut into pieces
1 1/2 cups mini chocolate chips
2 large eggs
2 tsp. vanilla
1/2 cup half and half


Directions:

Cover a large baking sheet with parchment paper, set aside

In a large bowl, whisk together the flour, sugar, baking powder and salt.  Using a pastry cutter or two butter knives, cut the butter into the flour mixture until the texture resembles coarse meal ( I rotated between criss-cross slicing through with my knives and using my hands to break up the butter and work it into the flour.)  Add the chocolate chips and stir to evenly distribute.

In a medium bowl, add eggs, vanilla and the half and half and whisk until combined.  Add the dry ingredients to the egg mixture and mix until just moistened and the dough holds together.  

Place your dough onto a floured surface.  Pat out the dough until it is roughly an 8x8 (a square, feel free to use a ruler to get it right) and about 3/4" thick.  Cut the dough into 2 inch squares.  Here is what it should look like at this point:


Now you are going to cut each of these squares in half diagonally to make little triangles.  They may seem small but trust me, they will bake to be the perfect size.  Using a flat spatula or your butter knife, move the triangles to the prepared baking sheet.  I like to mold them a little with my fingers just to make sure there are no little pieces of dough sticking out that might burn in the oven.  I fit all 32 scones on one baking sheet.  Like this: 


The next step is to put your baking sheet full of scones into the refrigerator or freezer.  I used my freezer.  Leave them in the fridge to chill for 45 minutes or the freezer for 30 minutes.  Set your timer to go off a little earlier than that so you can preheat your oven to 425 degrees.

When the time is up, remove them from chilling and place them in the oven.  Bake them until they are golden brown, approximately 15-20 minutes.  Remove from the oven and cool completely on a cooling rack.

Enjoy!


February 8, 2013

Cinnamon chip scones


I love how simple this recipe is.  Many cinnamon scone recipes call for heavy cream or buttermilk and those are things that I don't usually have on hand.  I wanted something as basic as possible.  So here it is!  

I happen to love scones just about any way I can get them.  Another great thing about this recipe is that my kids love them too.  They disappear pretty quickly in this house! :)  ENJOY!


cinnamon chip scones

1 cup whole wheat flour
1 cup all purpose flour
1 Tbsp baking powder
1/3 cup sugar
1/2 tsp. salt 
1/2 cup stick butter
3/4 cup milk
1/2 cup-1 cup cinnamon chips (1 cup is about half a bag)


Putting it all together...

Preheat your oven to 350 degrees.

In a large bowl, whisk together the dry ingredients...the flour, the baking powder, the salt and the sugar.

Cut the butter into little cubes and add them to the dry mixture.  Mush the butter into the flour mixture with your fingers until it is incorporated and a coarse meal is formed.

Add the milk and the cinnamon chips and stir until a ball of dough forms.

On a floured surface, pat the dough into a disk, then cut into eight triangles like a pizza.  I like to get some flour on my hands and shape my scones so that the corners are more rounded.

Place on a parchment lined baking sheet and bake for 15-20 minutes.

Yum!


November 1, 2012

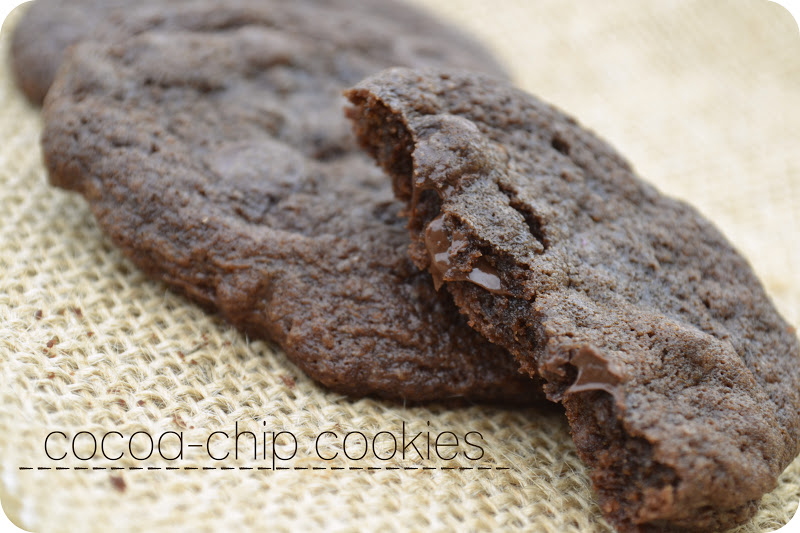
cocoa-chip cookies


Joelle and Brienne baked these yummy chocolate cookies recently.  As soon as I took a bite I knew we had found a new favorite.  These are a cross between a chocolate chip cookie and a warm gooey brownie. 
They are delicious!  Perfect with a glass of milk!

cocoa-chip cookies

ingredients:

1 1/2 cups all-purpose flour
3/4 cup unsweetened cocoa powder, sifted
1/2 tsp. baking soda
1/2 tsp. salt
1 cup butter, softened
1 cup packed brown sugar
1/2 cup granulated sugar
2 eggs
1 1/2 tsp. vanilla
2 cups semi-sweet chocolate chips (1 bag)


directions:

Preheat oven to 350 degrees.
In a medium bowl, combine flour,  (sifted) cocoa, baking soda and salt.  Set aside. 

In a large bowl, using an electric mixer on medium speed, beat the butter and both sugars until light and creamy, for about 3 minutes.  Add the eggs, one at a time, beating well after each addition.  Beat in the vanilla.  On low speed, gradually add the flour mixture, beating until blended.  With a wooden spoon, stir in the chocolate chips.

Drop dough by heaping tablespoonfuls about 2 inches apart on a greased cookie sheet. Bake in preheated oven for 8 to 12 minutes or just until set.  Cool for 5 minutes on the cookie sheet, then transfer to a cooling rack and cool completely.  Makes about 3 dozen.


September 19, 2012

chocolate nut biscotti


Recently, my daughters and I got creative and slightly modified a biscotti recipe.  We threw in some ingredients that we already had on hand from previous baking we had done.  We stirred in the melted chocolate just enough to get this swirl effect.  We all really liked the results.  Not only in appearance, but in taste as well!


chocolate nut biscotti

ingredients:
2 large eggs
2 Tbsp. instant coffee (I used 1 Tbsp. of espresso coffee grinds)
1 tsp. vanilla extract
2 cups all-purpose flour
1 1/2 tsp. baking powder
1/4 tsp. salt
1/2 cup butter or margarine, softened
3/4 cup granulated sugar
1 cup chopped nuts (I used almonds)
4 oz. unsweetened or bittersweet chocolate, melted

directions:

Preheat oven to 375 degrees.
Lightly butter and flour a large baking sheet.
In a small bowl, stir in eggs, coffee, and vanilla until well blended; set aside.
In a medium bowl, mix the flour, baking powder, and salt; set aside.
In a large bowl, beat the butter and sugar with an electric mixer on medium speed until light and fluffy.
Beat in the egg mixture.
Gradually add the flour mixture, stirring well after each addition.
Stir in the nuts and the melted chocolate (see instructions below)
Divide the dough into two equal portions.
On the cookie sheet, shape the dough into two logs, each 14" long, 1 1/2" wide, and 1" thick.
Place the logs 5" apart on the the prepared baking sheet.
Bake for 20-25 minutes.
After five minutes, transfer to wire rack to cool.
Once cooled, transfer to cutting board and cut each log diagonally into 3/4" slices.
Bake for an additional 12 minutes.

Microwave method for melting chocolate:

Using a microwave-safe container, microwave the chocolate at medium power (50%) for 1 to 1/2 minutes.
Remove and stir.  If not melted, return to microwave and repeat heating step, stirring every 30 seconds.  Be careful not to scorch the chocolate.  If you have small lumps, remove from the microwave and continue to stir to melt the chocolate.


September 13, 2012

pumpkin muffins [recipe]


Are you as ready for Fall as I am?

Summer was wonderful with its watermelons, water fun, bare feet and lazy days.  But I'm longing for Fall in all its pumpkiny, leaf-changing goodness.

If you're looking for something pumpkiny, this recipe does not disappoint.  My kids even love these things!  And they have been known to be picky eaters.  These muffins are moist and the tops have a slightly crisp texture combined with the yummy cinnamon-sugar taste.  You will love them, I just know it!

pumpkin muffins
{makes one dozen}

ingredients:
for the batter

1 cup canned pumpkin (from a 15 oz. can)
1/3 cup vegetable oil
2 large eggs
1 teaspoon pumpkin pie spice
1 1/4 cups sugar
1/2 teaspoon baking soda
1/2 teaspoon salt
...................................
1 1/2 cups all-purpose flour
1 teaspoon baking powder

for the topping
1 teaspoon cinnamon
1 tablespoon sugar 

directions:
for the batter

With oven rack in middle position, preheat oven to 350 degrees.  Place liners in muffin cups.  I love the foil liners, the baked muffins remove from them very well.

In a large bowl, whisk together the pumpkin, oil, eggs, pumpkin pie spice, the 1 1/4 cups sugar, baking soda and the salt until smooth.

In a medium bowl, combine the flour and baking powder, stir to combine.  Whisk the flour mixture into the batter just until combined.

Divide the batter among the muffin cups.  I used a 1/3 cup measuring cup with a spout, which worked very well (each cup should be about three quarters of the way full.)


for the topping
In a small bowl, stir together the cinnamon and 1 Tbsp. of sugar.  Sprinkle the tops of each muffin with a generous amount of the topping.

Bake for approx. 25 minutes or until puffed and set and a wooden pick comes out clean. 

Cool in muffin pan, on a rack, for 5 minutes.  Then, transfer muffins from the pan to a rack and cool to warm or room temperature.  I prefer them to be completely cooled, I think it brings out the flavor more.  

Have a wonderful Fall season!


September 11, 2012

Sausage-egg casserole


The alarm went off at 4:30am.  Time to get up and put together those ingredients I had prepped the night before.  I had cooked the sausage and chopped the veggies.  Everything was ready.  I had enough time to combine the ingredients and bake it in time for my husband to leave for his Bible study.

I was glad for the prep the night before because I didn't want to have to think through too much that early in the morning!  I actually did end up forgetting the milk.  But I'm happy to say that it was still good. This morning I enjoyed some of the leftovers for my breakfast. :)

This recipe, in its most basic form, does not call for any veggies.  I simply added what I wanted.  It's like pizza in the sense that you can add whatever veggies, meat or cheese you like.  This is your opportunity to get creative!

Another thing I like about this recipe is that it has a very short bake time.  Many egg casseroles take as long as an hour to bake.  But this one?  Only 15-20 minutes and it's done. Works for me!

Sausage Egg Casserole

ingredients:
1 block of "regular" Jimmy Dean pork sausage (or less if you prefer)
1 8 oz. pkg. of refrigerated crescent roll dough
2 cups mozzarella cheese, shredded
6 eggs, beaten
3/4 cup milk
salt and pepper, (I sprinkle a little on top)
green bell pepper, one half
red bell pepper, one half

directions: (this is the way I did it, with prep the night before)

[the night before]
Cook sausage in a skillet over medium-high heat until evenly brown.  Drain grease and set aside to cool, then refrigerate.  
Chop vegetables to bite-size chunks.  They can be whatever size you prefer, refrigerate.
Shred your cheese if you did not purchase it shredded.  I prefer to minimize my workload and I purchase it shredded.  Totally up to you.

[the following morning]
Preheat oven to 425 degrees.
Spray a 9x13 casserole dish with cooking spray.  Lay the crescent rolls flat in the bottom to form a crust.
In a bowl, combine the cooked sausage, cheese, eggs, milk and any veggies you are using.
Sprinkle salt and pepper over the top, add it according to your taste.
Bake in a preheated oven for 15-20 minutes, it should be bubbly with the rolls baked and firmly set.


August 22, 2012

peanut butter and chocolate biscotti


The combination of peanut butter and chocolate has always been one of my favorite things.  This yummy biscotti was a hit with the entire family!  Enjoy!


peanut butter and chocolate biscotti

ingredients:

3 cups all-purpose flour
2 tsp. baking powder
1/2 tsp. salt
6 Tbsp. unsalted butter, room temp
3/4 cup creamy peanut butter
1 cup sugar
2 tsp. vanilla extract
3 large eggs
1 cup mini chocolate chips

directions: 

Preheat oven to 350 degrees.  Line a baking sheet with parchment paper.

In a medium bowl combine the flour, baking powder, and salt.  Blend with a wire whisk.

In a large bowl, combine the butter, peanut butter and sugar.  Beat on medium-high, until fluffy and smooth (1-2 minutes).  Blend in the vanilla.  Add the eggs, one at a time, scraping the bowl between each addition.
On low speed, blend in the dry ingredients just until incorporated.  Stir in the chocolate chips evenly.

Divide the dough in half.  Shape into 11x13 logs.  Place onto the parchment lined baking sheet, about 3 inches apart.

Bake for 30 minutes.  Transfer to a rack to cool for 10 minutes.

Place on a cutting board and using a serrated knife, cut 1/2 to 3/4 inch slices.

Place on baking sheet, cut side down and bake for 10-15 minutes.  Turn them over and bake 10-15 minutes more.  Cool completely and store in an air tight container.


August 11, 2012

chocolate chip cookies {a family favorite}


Chocolate Chip Cookies

ingredients:
3/4 cup granulated sugar
3/4 cup packed brown sugar
1 cup stick margarine or butter, softened
1 large egg
2 1/4 cups all-purpose flour
1 tsp. baking soda
1/2 tsp. salt
1 12oz. package semisweet chocolate chips (2 cups)

directions:
Heat oven to 375 degrees.
Mix sugars, margarine/butter and egg in large bowl.  Stir in flour, baking soda and salt (dough will be stiff).  Stir in chocolate chips.
Drop by rounded tablespoonfuls about 2 inches apart onto ungreased cookie sheet.
Bake 8 to 10 minutes or until light brown (centers will be soft).  Cool on cookie sheet for one minute, then transfer to a wire rack to cool for about five minutes.  Then serve up the chocolate chip goodness with an ice cold glass of milk!


July 5, 2012

When mommy doesn't like to play that game & blueberry zucchini muffins


I remember when Amera, our firstborn, was a little girl.  She had these little beanie baby toys.  One was a frog that was orange, yellow, and purple.  I can't remember what the other animals were but she would sit on the floor and pretend that they were talking.  She would do the voices.  She loved to play this way.  She wanted me to play too.  At first I would agree to it, but after a few minutes I was ready to move on.  The fact of the matter is I hated the game and found it to be boring and awkward.  There have been occasions when I have been in a crazy-fun sort of mood and I've had the kids giggling over my funny-voiced characters.  But that is me in rare form.  I often struggle trying to find things for the characters to say.  I usually start off well, but then it begins to feel like a waste of time.

Even now, there are things that we enjoy doing together and things that we do on our own.  I think I had to learn to not feel guilty about not enjoying her little animal game.  It was just something we couldn't really share a love for.  And that really is ok.

One thing that I really looked forward to as she was growing up was a time when we would sit and have "grown up" conversations.  Conversations about life and about God.  Sharing our thoughts with each other.  I wondered when those days would finally come.  And even now I'm not quite sure when it happened, but I think it must have been a gradual process from the time that she was little.  Because even though I didn't like to play "let's talk with the animals", there were other things we did.  And I think we've gotten to know each other quite well as we figured out ways we liked to spend time together. 

This morning I enjoyed a cup of coffee with her.  Conversation over our Colossians study was rich and meaningful.  Things we've been thinking long and hard about, things we are questioning and wanting to understand more.  I love hearing what she thinks about things.  It's exciting to see that she is learning to think biblically about the world around her.

I have six other children now.  They are in various stages of growth.  I delight in them.  Though our conversations are not very deep right now, my time with them is precious.  Before I know it they'll be at that point.  I just have to make sure I pave the way by talking with them on their level and making sure they know that what they have to say is very important to me and it always will be.
............................................................................................................

Here is a recipe that Amera and I really like.  This is a recipe from a friend who has a blueberry farm.  After purchasing a bucket-full of her delicious berries, I knew this was a recipe I wanted to try.  I think they are best right after that twenty minute cooling period and still warm from baking in the oven.  :)


blueberry zucchini muffins

ingredients:
3 eggs, lightly beaten
1 cup vegetable oil
3 tsp. vanilla extract
2 cups white sugar
2 cups shredded zucchini
3 cups all-purpose flour
1 tsp. salt
1 tsp. baking powder
1/4 tsp. baking soda
1 Tbsp. ground cinnamon
2 cups blueberries

directions:
Preheat oven to 350 degrees.
In a large bowl, beat eggs, oil, vanilla and sugar together.
Fold in the zucchini.  
In medium bowl, combine flour, salt, baking powder, baking soda and cinnamon.  Stir to mix.
Pour into egg mixture and beat to combine.
Gently fold in the blueberries.
Ladle the batter into 24 greased muffin cups (or 2 loaf pans, or 4 mini loaf pans).
Bake for 45-50 minutes.  Cool for 20 minutes in the muffin pan.  Then remove and transfer to wire racks to cool.  These are so delicious served slightly warm.  Enjoy!


July 4, 2012

A mission trip, a birthday and a peach crisp recipe


It's hard to believe that Amera leaves this coming Sunday for the mission trip to New England.  She will be going with her youth group and she will be gone for nearly two weeks.  They will be helping out with a "VBS" (Vacation Bible School) and also going to a Christian camp.  

We are wrapping up the final details and mentally preparing to miss her immensely.  We have appreciated the "Rent a Teen" opportunities that our church family provided for her to earn the funds for the trip.  She did some outdoor work, she cleaned blinds and she had the unique opportunity of shelling a substantial amount of pecans!  She is still working on them...about an hour each day, and she is almost finished.  She also participated in selling some fundraiser coupons and the youth group had a big yard sale, many of the items were donated by fellow church members.  It was a huge success!

Today we are all excited to celebrate Clara's fifth birthday/our nation's independence.  This will be a first.  ;)  We decided that since my husband had the day off and we want to grill and make cupcakes anyway...why not just celebrate our little girl's birthday while we are at it!  We're pretty excited to give her a little robot to help her learn more about the alphabet and numbers.  We might do a little craft and learn a bit about "Independence Day" as well.

It's just us today.  Not much fanfare.  Oh, we'll have fun, I'm sure.  But these days we tend to avoid the crowds at fireworks shows.  Maybe it's because we haven't found a place we'd really like to go yet.  We can usually see some from our backyard and I guess I feel satisfied with that.  We are not the firework purchasing type.  Too much like our money going up in smoke I guess. ;)  Last night, around midnight, people in our neighborhood were setting them off and it sounded like agonizing screams of torture.  Seriously, my kids were all asleep in their beds and I was just waiting for them to wake up crying in terror.  It never happened though, thankfully.  Anyway, that's just me, I'm not saying you're bad person if you set off some fireworks.  Just please don't do it in our neighborhood at midnight. ;)  

On another note, have you ever tried a peach crisp?  This recipe will set off some fireworks!  Talk about explosion of flavor!  The tartness of tender, ripe peaches combined with the crispy sweetness of the topping make for an amazing dessert.  Top it off with a scoop of vanilla ice cream and eat it quick before it melts!


peach crisp

ingredients:
3/4 cup quick oats
3/4 cup brown sugar
1/4 plus 1/8 cup (3/8) all-purpose flour
3/4 tsp. cinnamon
1/4 plus 1/8 cup (3/8) butter, cut in small pieces
12 medium peaches

directions:
Fill a large saucepan with water and bring to a boil.  Fill a large bowl with water and ice.  Using tongs, place peaches in the boiling water for 2-3 minutes.  Then place them in the bowl of icy cold water.
Transfer the peaches to a cutting board to remove skin.  Using a sharp knife, slice around the peach in several sections.  The skin should peel off easily.  Use a fork, if necessary, to begin the peeling.  Slice the peaches (I cut mine into small chunks).  Spread the peaches into a 9x13 casserole dish to form an even layer on the bottom.

In a medium mixing bowl combine the oats, brown sugar, flour and cinnamon.  Cut in the butter until the mixture is crumbly (I preferred to use my hands).  Sprinkle this mixture on top of the peaches and bake at 350 degrees for approximately 40 minutes.

June 13, 2012

chocolate pudding pie [recipe] to top off a full day


{written last night...}

It's the end of the day, I'm sitting on my couch looking out the window at the golden glow of the setting sun.  It's so beautiful tonight.  Amera is playing some evening piano.  Summer break usually makes for unusual playing times.  I'm enjoying this bit of rest after a very busy day, this time to sit and reflect.

Joelle heartily sings to the tune of the music, not words...just beautiful sounds.  Isabel sits in her bouncer chair watching her sister and doing little "raspberries" with her lips and tongue.  Such sweet little baby noises she makes.

Amera and I had somewhat planned to look up a tutorial on how to crochet stars for a project I want to do, but we are both feeling tired and obviously feeling like doing other things. ;)

Brienne sits at the dining room table working on a book she is writing.  The others have all gone off to bed to look at books.  It's a new practice they have.  Every night they ask me "Can we look at books?"  And they get so excited when I say yes.  I admit, that brings my heart joy.  Sometimes, it's just the little things in life...

>>>>>>>>>>>>>>>>>>>>>>>>>>>>>>>>>>>>>>>>>>>>>>>>>>>>>>>>>>>

Like this pie I made yesterday.  It's downright delicious, I knew from the first bite that this recipe is a keeper!  It's also simple and fun to make.  I didn't get very detailed with my pie crust.  I also used a deep dish pie plate, which is why my crust looks smaller than the dish.  But it held the filling well and I liked the way it came out.  This was my first time making my own pudding from scratch, and my first time shaving chocolate.  I used a paring knife to shave the chocolate.  Later, I googled it and apparently a vegetable/potato peeler works well.  I think I'll do that next time!


chocolate pudding pie

ingredients for pie crust:
1/2 cup, plus 6 Tbsp. all-purpose flour
1/2 stick butter, cut into small pieces
1 1/2 Tbsp. vegetable oil
1/2 tsp. salt

directions for pie crust:
Preheat oven to 475 degrees.
Using a handheld mixer, blend the flour, butter, oil and salt together until crumbly.
Add 1/8 cup cold water and mix just until a ball of dough forms.
On a lightly floured surface, roll out the dough and transfer to a pie plate.
Bake for 8-10 minutes and allow to cool completely.

ingredients for filling:
1/4 cup cornstarch
1/3 cup plus 2 Tbsp. sugar, divided
3 Tbsp unsweetened cocoa powder
1/4 tsp. salt
3 cups whole milk
4 oz. bittersweet chocolate, chopped into small pieces (I used Ghirardelli)
1 tsp. pure vanilla extract
1 cup heavy whipping cream
1 oz. (approx.) of shaved bittersweet chocolate, for garnishing

directions for filling:
Whisk together the cornstarch, 1/3 cup sugar, cocoa powder and salt in a heavy saucepan.
Gradually whisk in the milk.  Bring to a boil over medium heat, whisking constantly.
The mixutre will begin to bubble as it gets hotter, continue to whisk for 2 minutes to thicken.
You should have a thick pudding mixture at this point...remove the pan from heat and whisk in
the bittersweet chocolate pieces and the vanilla extract until smooth.
Pour the filling into the pie crust and chill for at least two hours.  The longer, the better in my opinion!
By the way, you can cover the pie with a piece of wax paper to avoid a "skin" developing on top.

Just before serving, beat the whipping cream with the remaining 2 Tbsp of sugar until soft peaks form.  The longer you beat it, the thicker it becomes.  I like it nice and thick!  Spoon it onto the pie and garnish with the chocolate shavings.  Enjoy!


June 6, 2012

persuasive speech and blueberry buckle


Yesterday, I taught my oldest daughter about persuasive speech.  We all have things we get excited about.  
There are concerns that we are passionate about.  Wrongs that we strongly desire to be made right.  After
I wrote the following last night, I realized that I wrote a bit of a speech of my own. :)  Let's just say what I
saw at the grocery store lit a fire within.  Does that ever happen to you?  


Parenting lie: "If your child throws a tantrum, just ignore it. 
If you pay attention to them it will only make things worse."

Parents, please do not believe this lie!  When your child is screaming at the top of his or her
lungs in the grocery store, you should not ignore them.  You should teach them how wrong 
and unacceptable it is to disturb every single human being in the building.  You should teach 
them how inconsiderate,selfish, and unloving to the rest of humanity it is to put their needs/wants 
above everything and everyone else.  It is imperative that they learn this if they are to be productive 
members of society and if they are to grow in wisdom and in favor with God and man. 

What I witnessed today at the grocery store was an absolute tragedy.  My heart broke in two 
for this mother and her child.  This two year old boy strapped into the cart screaming...at her.
He wanted something...obviously...and she acted as if she could care less.  Now, granted, he 
was going about it the wrong way, but why wasn't she teaching him?!
She even had a smug grin as if she thought this is perfectly normal and acceptable for a two year old.
At one point she came over to him and swatted him then walked back over to the cashier.  
He just screamed louder for her attention.  

I don't know what was harder to watch, the boy continuously screaming or the mother ignoring it all.
After they left the store, the cashier and bagger were talking it over.  They were shocked at what they 
had just witnessed.  The cashier commented "They say if you pay attention to them, it only makes 
things worse."  Friends, this makes me want to weep for our generation.  We cannot withhold correction,
guidance, nurture, and ultimately LOVE from our children.  We cannot afford to be intimidated by
our two year olds.  We are their God-given authority.  We may feel embarrassed at times, we may
be uncertain as to how to handle certain situations.  But by the grace and wisdom of God we must 
teach and discipline our children.  God's glory and their future depend on it.


>>>>>>>>>>>>>>>>>>>>>>>>>>>>>>>>>>>>>>>>>>>>>>>>>>>>>>>>>>>>>>>>>>>>>>>>

And now for the love of blueberries, I have a recipe that will amaze you.  I made this several years ago and decided that it was definitely a recipe I wanted to hold on to.  After getting some blueberries from some friends, this was the first thing I thought of making.  It makes an awesome dessert with a scoop of vanilla ice cream on the side.  And it also makes a delicious breakfast treat.  It's delicious when served at room temperature or served warm.  You really can't go wrong.  :)


blueberry buckle

ingredients:

for the batter
3/4 cup sugar
4 Tbsp butter, softened
1 egg, beaten
2 cups all-purpose flour
2 tsp. baking powder
1/2 tsp. salt
1/2 cup milk
2 cups blueberries

for the topping
1/3 cup all-purpose flour
1/2 cup sugar
1/2 tsp. ground cinnamon
4 Tbsp. butter, cold and cut into small pieces

directions:

Preheat your oven to 375 degrees.  Spray an 8x8 square baking dish with cooking spray.
In a large bowl, using a hand held mixer, cream the butter and sugar together.  Add the beaten egg.
In a medium bowl, combine the flour, baking powder and salt.
Add this dry mixture to the butter mixture a little at a time, alternating with the milk, and ending with the flour mixture.
Fold in the blueberries.
In a small bowl, combine all of the topping ingredients; mix them with a fork or use your hands to make a crumbly topping.
Pour the batter into the dish and sprinkle evenly with the topping.
Bake for 45 to 50 minutes, until golden brown.
Makes 6-8 servings.

TIP: to soften butter, microwave it on defrost for 20 seconds at a time.  When you can press your thumb into it and leave an impression, you know it's ready.

May 25, 2012

snickerdoodles for the recital


I've always loved snickerdoodles.  Even before I knew they were called snickerdoodles!
Such a happy little name for a cookie isn't it?

Amera really wanted to bring something other than chocolate chip cookies or brownies.
So snickerdoodles it was!

My husband wasn't able to attend this recital.  I think this would be the first time
that happens.  He had an important "work" commitment...he was personal chauffer to 
several Scotsmen wearing kilts.  I know, sounds like quite a unique opportunity right?
That's what I thought.  :)  Well, we certainly missed him.


Apparently there were plenty of leftovers that we were asked to "help out" with.
Of course the children gladly obliged. ;)

She did a great job!  We are so glad she is using the gifts God has given her.
We're also glad we stuck with piano lessons when we could barely afford it!

And now for that recipe...


snickerdoodles
The recipe says it makes 4 dozen, but I think I made mine bigger than what it called for.  I ended up with about 3 dozen.  

ingredients:

1 1/2 cups sugar
1/2 cup stick butter, softened
1/2 cup shortening 
2 large eggs
2 3/4 cup all-purpose flour
2 tsp. cream of tartar
1 tsp. baking soda
1/4 tsp. salt
1/4 cup sugar
2 tsp. ground cinnamon

directions:

Heat oven to 400 degrees.

Mix 1 1/2 cups sugar, the butter, shortening and eggs in a large bowl.  Stir in the flour, cream of tartar, baking soda and salt.  

Shape dough into 1 1/4 inch balls ( or a little bigger for a bigger cookie).  Mix 1/4 cup sugar and the cinnamon. 
 Roll balls of dough in the cinnamon mixture.  Place 2 inches apart on an ungreased cookie sheet.

Bake 8 to 10 minutes or until set.  Remove from oven.  Cool for one minute then transfer to a cooling rack.


May 18, 2012

rosemary bread [similar to Macaroni Grill's]


Do you know how wonderful fresh rosemary smells?  

Admittedly, I have always been a dried herb kind of gal.  That is...until now.  
Once I used fresh herbs, there was just no going back.  The aroma and the taste are just amazing!

Only one drawback, they come in bunches and one recipe will not use it all.  You won't want to waste these wonderful herbs.  I found that I was able to make three batches of this delicious bread (six loaves) with one bunch of rosemary.  This was over the course of almost 2 weeks. I kept the rosemary in a jar with a little water at the bottom and in the fridge. You can also use your leftover rosemary on chicken or in another recipe.  It just takes a little planning and nothing will go to waste.  :)  You will be so glad you used fresh rosemary...trust me!


This bread is very similar to the one served at Romano's Macaroni Grill.  I have made it with bread flour and with all-purpose flour.  Both were delicious, but I prefer the all-purpose.  It seemed to be just a little firmer with a slightly crispier crust.  This bread is our new favorite.  Not too many ingredients and a recipe that is simple and easy to follow.  Give it a go, I'm sure you'll find a new favorite too!


Rosemary Bread
(makes two round loaves)

ingredients:

1 cup warm water
1 package active dry yeast
1 Tbsp. sugar
2 cups (plus 1/2 cup for kneading)flour
1 tsp. salt (plus a little coarse salt for sprinkling)
2 Tbsp. fresh rosemary, chopped, divided in half
2 Tbsp. butter, divided in half


directions:

In a large bowl, add warm water, yeast and sugar.  Allow this mixture to froth, about 10 minutes.
Mix in 1 Tbsp. of butter, salt, and 2 cups flour. (I use a handheld mixer) Mix just until combined.
Add 1 Tbsp. fresh chopped rosemary
Knead for about 10 minutes by hand (5 in a food processor) until smooth and elastic. Add additional flour as needed to prevent stickiness.
Pour about a tsp. of oil in a bowl, place the ball of dough inside and cover with a towel.  Let it rise in the warmest part of your kitchen for one hour until it doubles in size.
Once the dough has doubled punch it down with your fist and divide it in half.
Let the dough rest for about 5 minutes.
Spray a cookie sheet with cooking spray.
Shape the dough into 2 small rounded oval loaves.
Sprinkle the remaining Tbsp. of rosemary over the tops of the loaves and press lightly into the surface.
Let the loaves rise again until doubled, about 45 minutes.  
Set your timer for 35 minutes and preheat your oven to 375 degrees.
Bake for 15 to 20 minutes, until lightly browned.
Remove from oven and lightly brush with butter.  Sprinkle on coarse salt.  Serve warm. 
If reheating is necessary, do so in a 375 degree oven for 8 minutes.

Have you ever wondered just why you have to knead dough?  Especially for 10 minutes?!

Well, I wondered too.  So as I was kneading, I asked my daughter, Amera to google it.  This is the very interesting article she found: "Why knead?" <<<mouse over to click on link<<<

Related Posts Plugin for WordPress, Blogger...